As a result of building my new NAS (read about the build in the efficient home server series) I’ve decided that I’m going to switch to TrueNAS SCALE as primary OS. However, coming from OpenMediaVault there were a few things to get used to. There also indeed were a few things that in my eyes definitely are huge deal breakers in TrueNAS SCALE. For example TrueNAS SCALE occupies the whole system disk and it does not leave you any choice there.
In general, if you’re out to change things in TrueNAS SCALE and need help or want someone to discuss your ideas with, steer clear of the official TrueNAS SCALE forums or discord. They hate when people start playing around with their “appliance”.
TL;DR:
- TrueNAS SCALE always occupies the whole system disk
- Small (~30GB) SSDs not significantly cheaper than big (~250 GB) drives anymore
- Make use of unused space on system disk
In short, under the hood it’s a pretty ordinary debian system. There’s a few (artificial) limitations, but many of them can be remedied pretty easily. Thus, in this article I would like to introduce two methods you can use to liberate the unused system disk’s space. In my other TrueNAS SCALE articles I’ll be discussing a few more of them, because there’s plenty to do 😁
Contents
The idea
In short, how do I want to solve the problem you ask? It indeed is possible to confine TrueNAS SCALE to a partition on the system drive and make the rest of the drive available through an additional partition. I would like to mention that the idea of what we’re doing here definitely not new, but most of the articles I found were either a bit outdated or (partially) broken.
How?
TL;DR:
- The method in this article requires a reinstall
- During installation, edit the installer script
- Create additional partition
- Make partition available in zpool system
The method described in the following text does need you to reinstall TrueNAS SCALE. That might sound like a big deal, but ix-systems made it pretty easy to do re-installs. Assuming you didn’t do anything funny and unsupported to your install previously you can just export your settings, reinstall and import your old settings and you’re good. From my understanding that is also essentially how updates in TrueNAS SCALE work.
!!! Backup all your data !!!
Exporting your current TrueNAS SCALE configuration
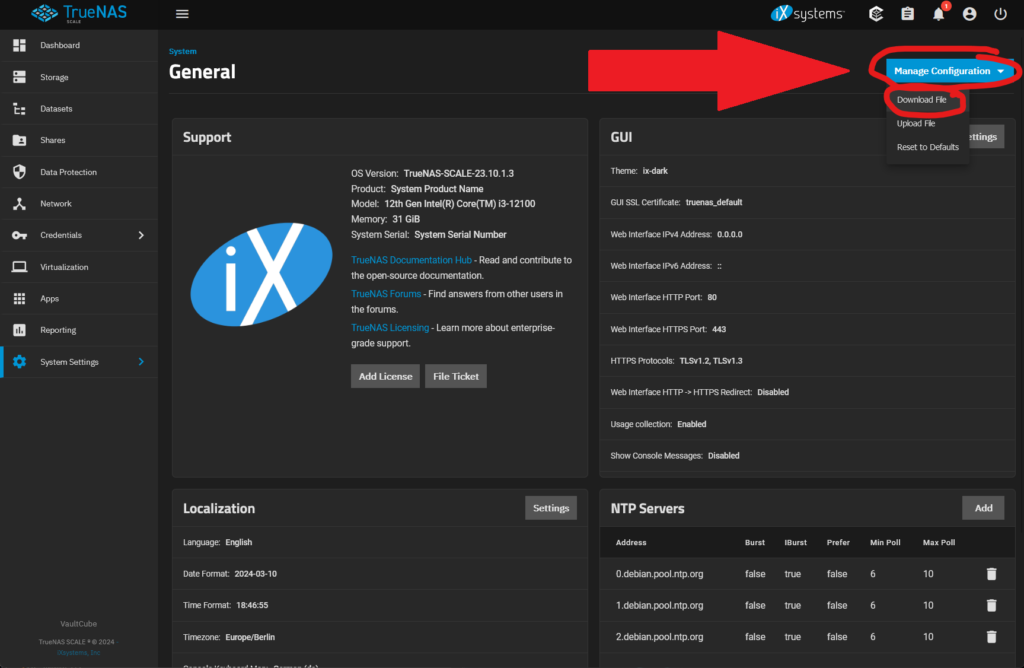
Firstly, should you already be running TrueNAS SCALE already, start with exporting your settings. In the WebUI this can easily be done on the “General” page of the “System Settings”
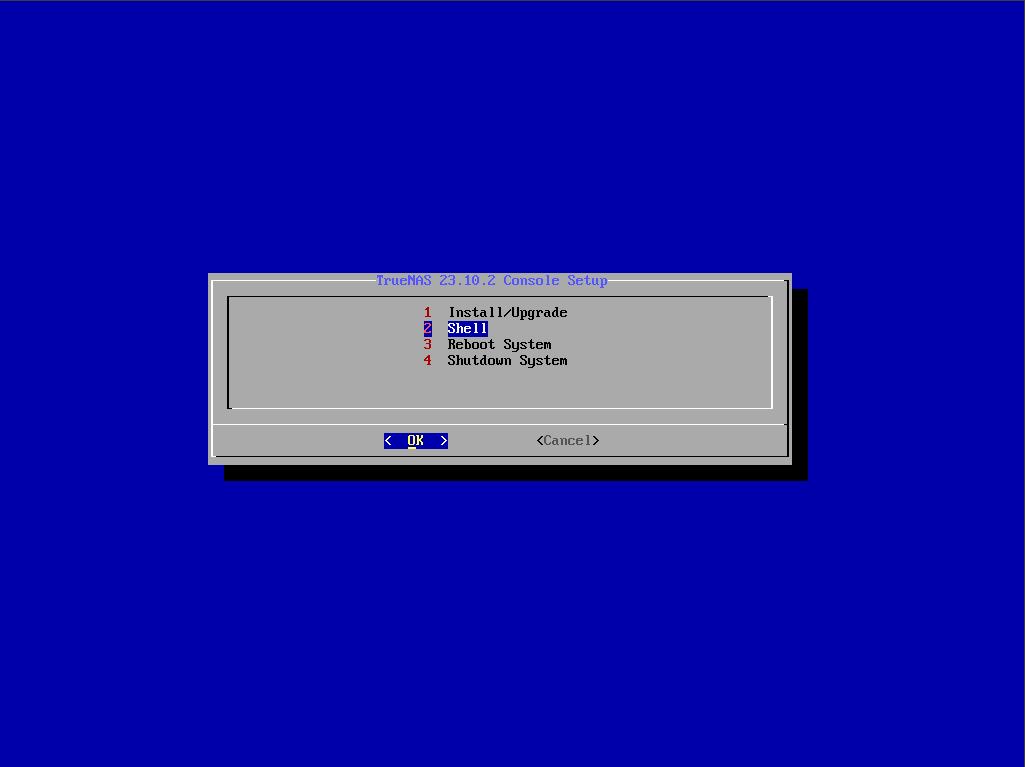
Secondly, boot up into the TrueNAS installer and open a shell by selecting the corresponding entry in the install menu.
Once in the shell you have two options to continue.
- If you want to do everything manually, continue with the following steps.
- You can use my TNSH (TrueNAS SCALE Helper) script and let it do the hard work for you. Continue with the instructions following in the script section.
You should certainly only choose option 1 if you’re comfortable using the shell and know your way around the standard shell tools like nano and parted.
Manually installing TrueNAS SCALE
1. In the shell you need to edit the installer script. Either open the file in nano or half-automagically modify the file using the following shell command:
sed -i 's/sgdisk -n3:0:0/sgdisk -n3:0:+32G/g' /usr/sbin/truenas-installThis patches the partitioning part of the installer to use 32 GB for the system partition instead of the whole remaining drive. The size of the partition in the previously shown code is 32 GB. However, should you want a bigger or smaller partition size, change it. If you’re in a pinch, 16 GB should do, too. Although that might get you in trouble installing updates or in future releases. I personally have 64 GB. That leaves me lots of headroom.
Make sure the main system partition is not bigger than the whole disk and also make sure there’s no typos. Otherwise the install will fail with a pretty obvious message. Either fix by hand or reboot and start over.
2. To continue further, start the installer again from the shell you’re in:
/usr/sbin/truenas-installThen just follow through the installer normally.
The first boot
3. As a result the installer will reboot when done, booting the system for the first time. In the following, make sure the system’s partition is the desired size. Make sure to take note of the device’s name (e.g. /dev/sda). Here the shell command `df` shall suffice.
df -hTo make use of the rest of the disk, it needs to be partitioned and made available to the zpool system, which will be explained below.
4. Next, to partition the empty space on the system disk, start parted. Then select the disk in question (in the example here /dev/sda) and create a new partition filling the whole disk.
parted
select /dev/sda
print
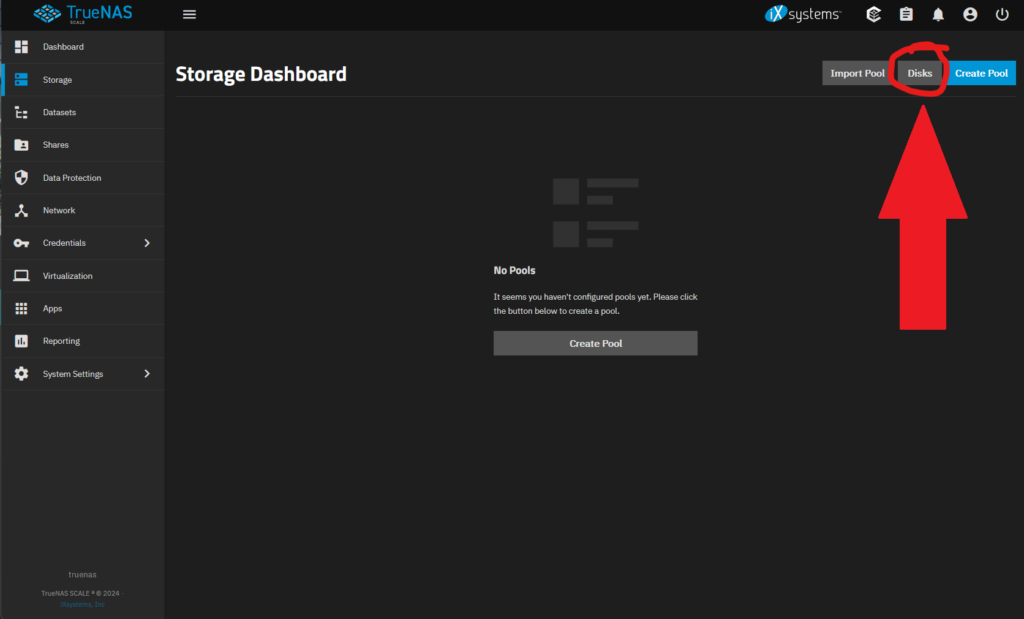
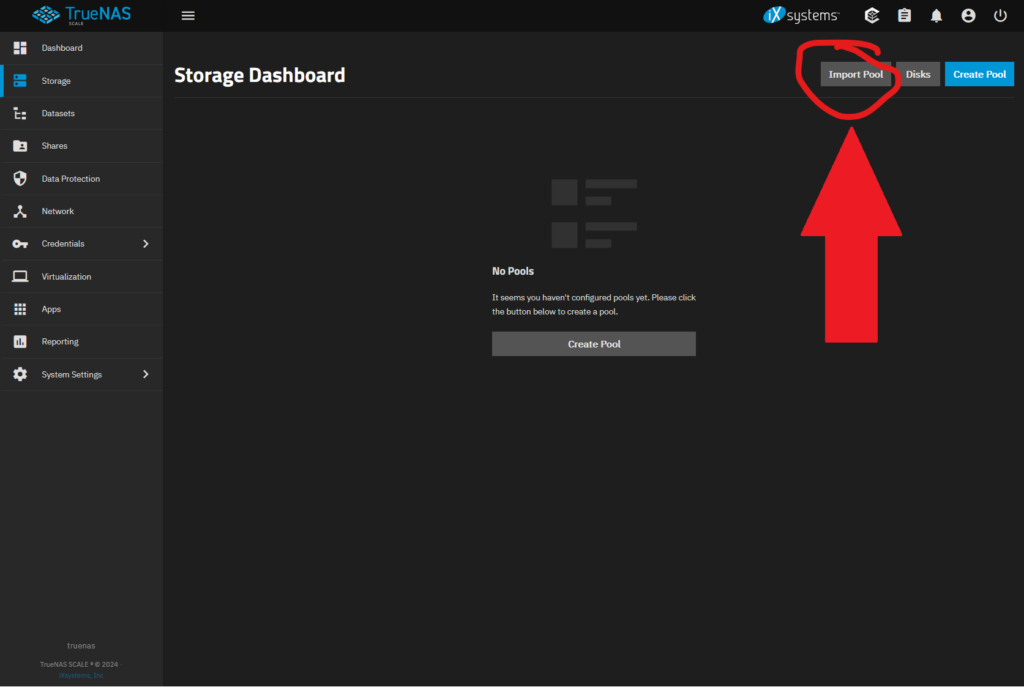
mkpart services 0% 100%You may use the above code block as a reference, but make sure to change the device in the code to your disk. If you don’t know which device TrueNAS SCALE is installed on, check the Disks list in the WebUI. To get there, go to the “Storage” page. In the top right you’ll find the button to reach the disk list.
After using the above code, parted may nag about the first few gigabytes of the disk already being occupied and additionally suggest a new start for the partition. Check the suggestion and accept it if ok.
Preparing the pool in the zpool system
5. Following the partition creation, to use it in TrueNAS SCALE it must be made available in the zpool system.
To do this, create a new pool on the system disk’s last partition you just created in the previous step (in my case /dev/sda5) by calling
zpool create services /dev/sda56. Now export it, so it can be exported to be able to import it from the WebUI later.
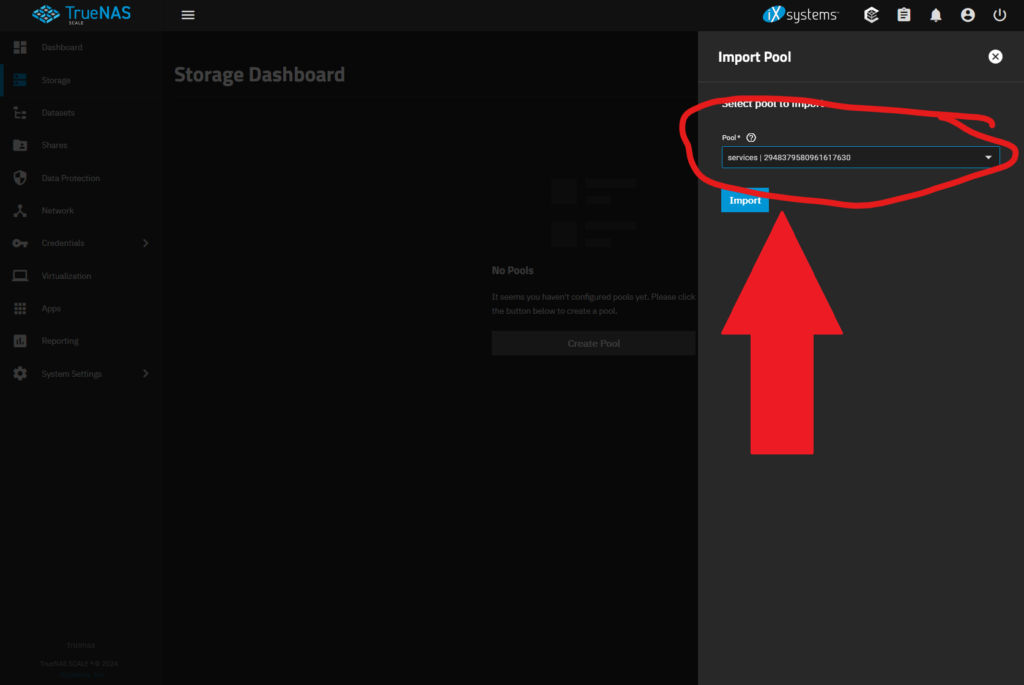
zpool export services7. In the WebUI open Datasets and import on the top right. Select the just created pool.
Done!
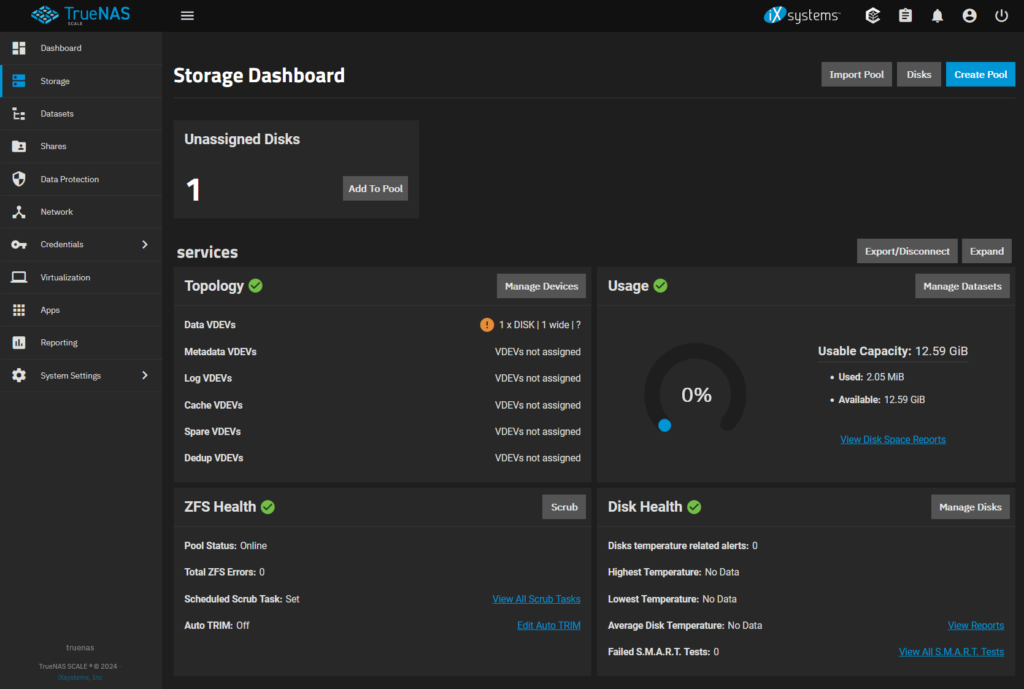
8. Congratulations, as a result there should now be a “services” pool on your storage dashboard!
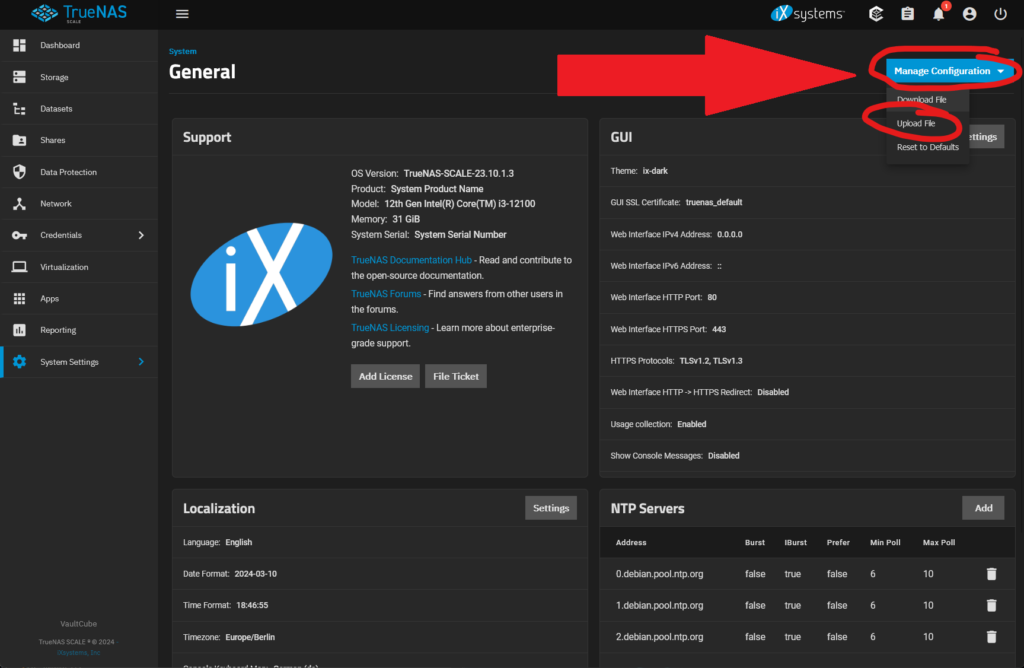
9. Lastly re-import your configuration from the WebUI. First click on the “System Settings” menu entry and choose “General”. Next just click on the blue “Manage Configuration” button in the top right and choose “Upload file” from the popup menu.
Installing TrueNAS SCALE with TNSH
1. Continuing from the installer’s shell, execute the following shell code:
curl -O https://raw.githubusercontent.com/kage-chan/HomeLab/main/TNSH/TNSH.sh
chmod +x TNSH.sh
./TNSH.sh
This will download and execute the TrueNAS SCALE Helper, which will patch the installer for you. You can check the source code of the script in my TNSH repo on github.
2. After starting, TNSH will detect that you’re currently booted into the installer and prompt you if you want to start in install mode. Answer with “y” for yes.
3. Choose the system partition’s size from the list. Currently you can choose between 16 GB (might be a bit small but works), 32 GB (should be more than enough) or 64 GB (if you have a big system disk it won’t hurt to leave some extra space). Make sure the system disk allows for a partition of the chosen size, otherwise the install will fail later on.
4. After TNSH patched the installer, you’ll be back in the installer’s menu. Continue the install as you would normally.
The first boot
5. Once booted up, enable SSH in the WebUI (System Settings -> Services; remember to enable the admin login group) and connect to your TrueNAS SCALE machine. Likewise, if using the console, in the TrueNAS SCALE console, select 7 to open a linux shell. The second variant is not recommended, since you can’t just copy paste code from here.
6. Run the following code to download TNSH and run it:
curl -O https://raw.githubusercontent.com/kage-chan/HomeLab/main/TNSH/TNSH.sh
chmod +x TNSH.sh
sudo ./TNSH.sh
7. As a result of the above code, the script will launch and present you with the main menu, where you can press “p” to launch the post-install menu.
8. At the time of writing, the post-install menu has two options. Of these we are going to use option 1 to fill the system drive with a new partition. This will look for the free space on the system disk, create a partition occupying the whole free space, create a zpool from it an make it available in the WebUI.
9. Thereafter the script will prompt for a block device to use. If you don’t know which device TrueNAS SCALE is installed on, check the Disks list in the WebUI. To get there, go to the “Storage” page. In the top right you’ll find the button to reach the disk list.
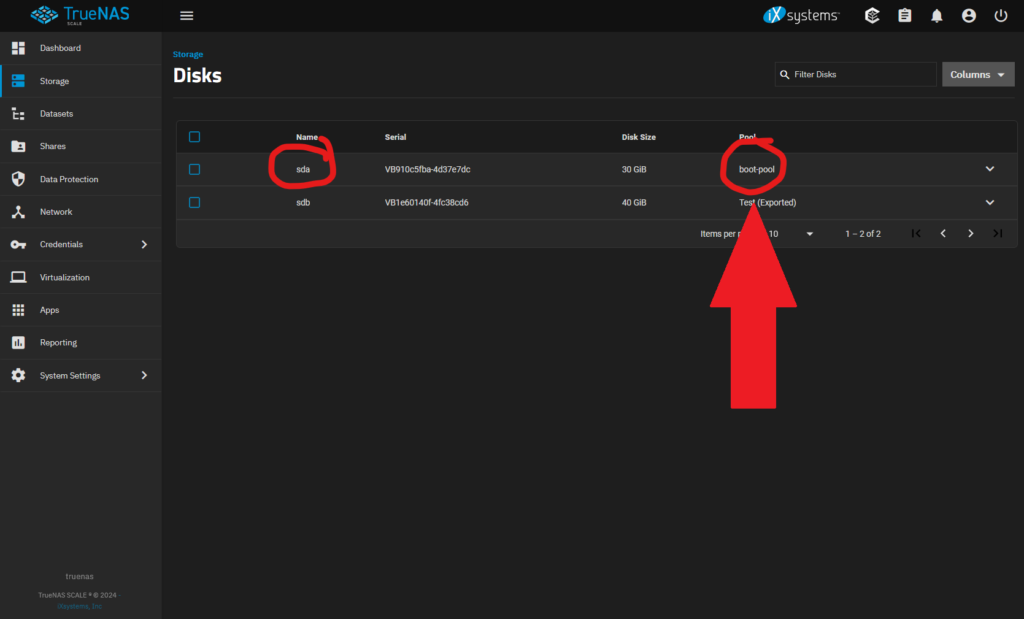
In the disk list you can easily identify the boot disk, because its pool name is “boot-pool” (circled area with arrow). After identifying the row, the block device’s name can be found in the name column (circled area without arrow).
10. Check if partition has been created successfully and answer prompts with yes.
Done!
11. Congratulations, as a result there should now be a “services” pool on your storage dashboard!
12. Lastly re-import your configuration from the WebUI. First click on the “System Settings” menu entry and choose “General”. Next just click on the blue “Manage Configuration” button in the top right and choose “Upload file” from the popup menu.
Conclusion
To summarize, in this article I’ve shown you how to liberate the drive space normally blocked by TrueNAS SCALE. Usually this portion of the disk is more than enough to use for virtual machines or containers. I’ve also given you a short introduction into TNSH. In fact, if you’re interested in the other features this script has to offer, go take a look at the script in my github. Besides making the blocked drive space on the system drive available, it can also install docker for you, optimize your system’s power usage and a few more things.
If you liked this article, you should indeed go check out my other articles related to TrueNAS SCALE, maybe you’ll find more interesting things 😁