I’ve been using Proxmox PVE for the last few years. The network isolation of the containers running inside docker therefore can sometimes feel a little restricting.
In Proxmox, each time you create a new container, or better LXC, the container by default gets direct access to the host’s network as if it was an independent computer on this network. This is called bridged networking and can often come in very handy. Docker’s “Network Bridge” on the other hand works a bit differently. By default it isolates the containers running from the host’s network and maps the ports of the containers to ports on the host’s IP. Hence, the container is accessed through the host’s IP as the mapped port.
Assume you’re running Nexctloud (Nextcloud-AIO for docker) and Vaultwarden (Vaultwarden on dockerhub.io) like me all in containers on the same docker host, each of them needs access to Port 443 for their WebUIs. In theory I could map each of the WebUIs to different ports. And, for only two applications that might even work to some extent. However, Nextcloud-AIO for example doesn’t even allow to change the ports. As a result, sometimes it is a lot easier, if the containers have separate IP addresses.
Contents
How?
TL;DR:
- Create macvlan configuration (Portainer only)
- Create macvlan network
- Add containers to the new macvlan network
Note:
In this example everything is IPv4 only, but it also analogously applies to IPv6.
So, how can a behavior like Proxmox’s LXCs be achieved with docker? Simply by using a network with the “macvlan” driver. If you haven’t yet, check out docker’s documentation for a first overview.
Requirements
To demonstrate how to use the macvlan, I’m going to explain two methods: by using Portainer CE and by using docker’s shell command. For both methods, you need to have the following data to proceed:
- Name of physical interface (or interface connected to host network)
- IP range of (sub)network
- Gateway’s IP
- IP range to use within the network
- (Excluded IPs)
In case you don’t know how to find the needed data, I’ll shortly explain how to find or define each.
1. The interface to use
is simple: open up a shell on the docker host and type in
ip link showYou need to know which of the interface is connected to the host network. From the list you just got, make note of the one that’s connected to the host’s network.
2. Subnet of you host
In my case the IP range of the network to use was my home network, which is simply 192.168.178.0/24.
3. The gateway
The gateway. This one was tricky. From my understanding this is not the gateway of your actual host network, but instead the IP you want to use as gateway for your macvlan. In my case I just used the first available address of the IP range to be used, which is 192.168.178.129 in my case (see 4.)
4. Subnet to use for IPs
Technically, the IP range to use within the network is optional. But, and this one is big, you should definitely use this if you’re considering to connect your containers to your main home network. Should you not define the IP range to use, docker will start using the IPs from low to high, starting with the first IP in the (sub)network range. Ever so often this is the real gateway of the network. This is also the case for my network. Having a second host in the network with this same IP will result in your network being defunct. Make sure to tell your DHCP server to exclude these IPs.
In my case I went with 192.168.178.128/28, since it was unused at this point and the 14 IPs this would give me would be more than enough. In fact /29 would have also been ok for me.
5. IPs to exclude
The IPs docker should exclude from the range of IPs to use are optional.
You could also not define 4 and just exclude all IPs docker should not use using 5. The result is the same. For me it’s just easier to define the small IP range to use and exclude that from my DHCP. Do as you think it’s easier for you.
Portainer
When I’m working with docker and I’m trying out new things I often use Portainer. I do this to eliminate my clumsiness as a variable. As it turns out Portainer may protect me from my mistakes, but it doesn’t necessarily make things easier. It took me quite a while to see that in Portainer – god knows why – creating a macvlan usually is a two-step process:
- Create macvlan configuration
- Create the actual macvlan network
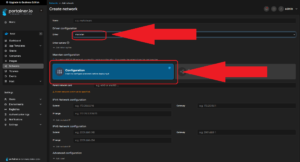
First, go to the list of networks of the docker host in question. On this page, click on In the first step you create the configuration for the network. The screenshot highlights the button you want.

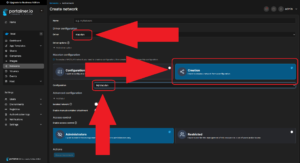
Secondly, create a network configuration for a macvlan network. The screenshot does highlight the important bit again.
After creating this network, you click on “Add network” again and now you can select “Creation” in the upcoming screen. As “Configuration” use the configuration created in the previous step. In this example I’ve chosen “MyMacvlan” as name for the configuration in the previous step.
Docker (shell)
When using the docker command in the shell things are a simpler. Most importantly, the whole procedure is just a single step. Open up a shell in the docker host. Again, you need to have the data from “Requirements” at hand:
docker network create -d macvlan -o parent=host0 \
  --subnet 192.168.178.0/24 \
  --gateway 192.168.178.129 \
  --ip-range 192.168.178.128/28 \
  myMacvlan
At this point the command may be pretty self explanatory to some, nevertheless I’ll take it apart briefly. docker network create tells docker that we want to create a network. After parent= you have to insert the network interface from step 1. --subnet is followed by the subnet from step 2. The gateway you determined in step 3 is used behind --gateway, and the --ip-range is taken from step 4. The last line is simply the name of the network you create.
Regardless which path you went, now you can use this network for containers you want to have dedicated IPs in the host network and they should be fully exposed.
Conclusion
If you prefer your containers directly exposed to your host network, using docker’s macvlan driver for networking might be a good option for you. This article covered two methods for your to achieve this.
One thing you should definitely keep in mind with this method is security. By fully exposing the container to the outside network you now have to keep two systems secure, the docker host and the container. In a controlled settings where all devices on my network are trustworthy and visitors are in an separate guest network this isn’t much of an issue. If your setup if different though, it might be worth considering.
If you liked this article, check out my other articles related to virtualization, maybe you’ll find more 🙂