Without a doubt, for a lot of pleople a CV is something they rarely think about, let alone write from scratch. When they need it, they need it fast and thus often don’t have much effort or time to spend for it. Just to have it at hand when I need it, I regularily keep mine updated.
Nonetheless, at some point in 2022, I wasn’t too happy with the looks of it anymore and went out onto the internet and looked for some inspiration. I certainly found a lot of very nice looking templates, many of them were in LaTex. Since LaTeX wasn’t new to me – for most of my scientific publications I used LaTex – I just gave them a try.
Contents
Why?
In fact, the idea had me sold pretty much immediately. Overall, I was pretty stoked that with a well made LaTex template the CV was done and ready in a very short amount of time, . You basically just have to punch in your data and get a really pretty CV. The downside certainly is, if you want to make changes to the template, this often turns into a very elaborate endavour.
Never the less, I went down the rabbit hole and made my own template, half out of curiosity and half because I didn’t find what I was looking for. I’ve put the finished template in my github repo in case someone would like to use it, this article shall server as introduction and sort of “manual” for the template.
I do plan to update – or rather add new templates to – the repo in the coming years. The structure might change significantly, so this article is about the 2024 version of my LaTeX CV template.
Basics
In the github repo you’ll also find an example CV I’ve created with the template.
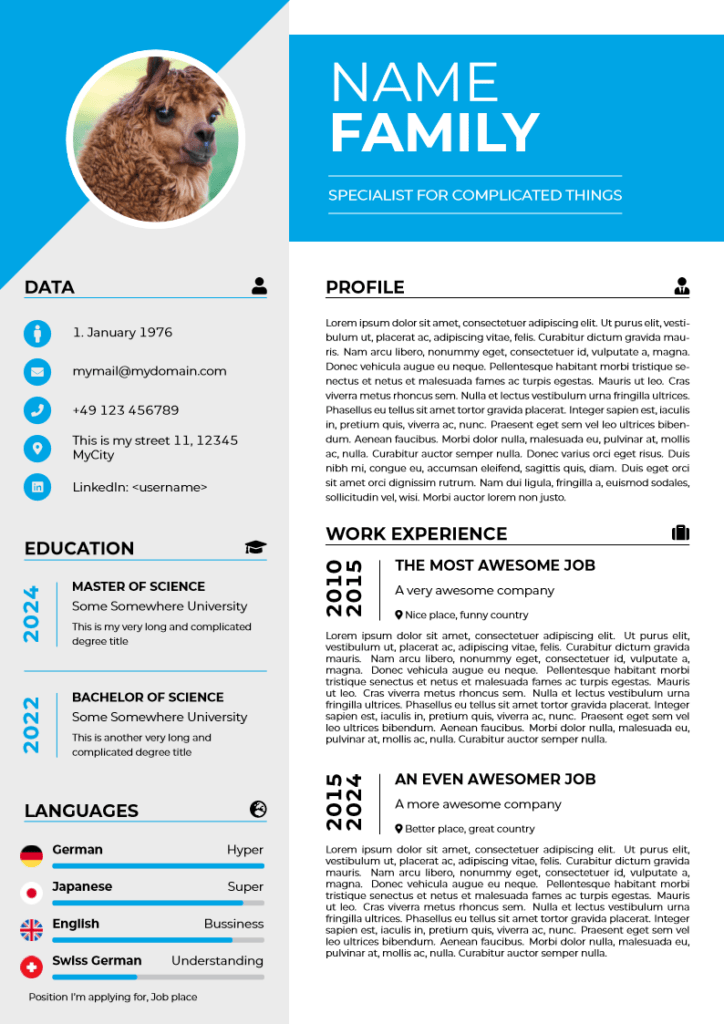
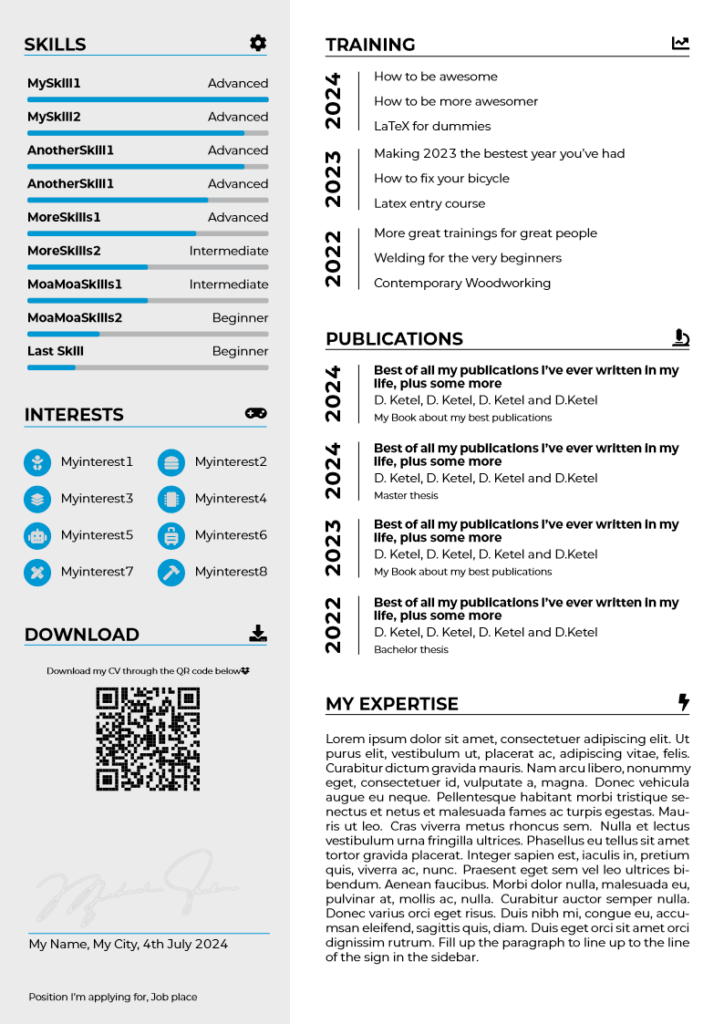
In short, the template consists of two files, plus an assets folder.
- The main .tex file
Contains the structure of the CV along with the data and is the main file that has to be edited. - The .sty style file
Contains style definitions and the implementations of the functions used in the main file. The top portion of the file can be edited by the user to change the colors and font of the template and to set a few options. - Folder with assets
Contains all images needed for compilation and optionally the font file(s)
I chose to link to the files in the github code viewer and not the raw files, so you can take a look at the files before downloading them. The files are known to certainly work well with XeLaTeX, other compilers might work, too. Using the files in Overleaf (online LaTex editor) is also no problem. In fact, I did most of the development in Overleaf. I thought about adding the template to Overleaf as template, too, but I didn’t want to have to keep the file up to date in multiple locations. If you want to use the template in Overleaf, please make sure to copy all neccessary files into a project there, also remember the Images folder.
A few considerations
Overall, the template is intended to generate a two page CV. You can also create a three or four page CV with it, but I personally believe (and know from my own experience) that people hiring other people don’t have very much time. Often, if the number of applications is high, the applications that look like only minimal effort was put into are eliminated first. Next, the extremely long ones will be discarded, since it often is a sign of the author being unable prioritize. After that, the ones that don’t fit the requirements are taken out of the pile, and so on. You get the idea. I can’t stress it enough: Keep the application reasonably short.
- One page (max. two) application letter-
- One cover page
- Maximum of two pages for the CV
But, we’re not here to talk about the application, we’re here for the CV. We’ll talk about the application (process) another time 😊
I’ve though a lot about the order to write this article. As a result, I think that it will be a lot easier to understand, if I explain the files in the “reverse order”. Hence, starting with the assets folder, continuing with the .sty file and finishing with the most complex (from the user’s view point) part, the .tex file should make the most sence.
The ‘Images‘ Folder
The assets folder in the example in the github repo contains all images and fonts that are used to demonstrate the template. To clarify the use of the image resources, I’ve numbered them in the images below.
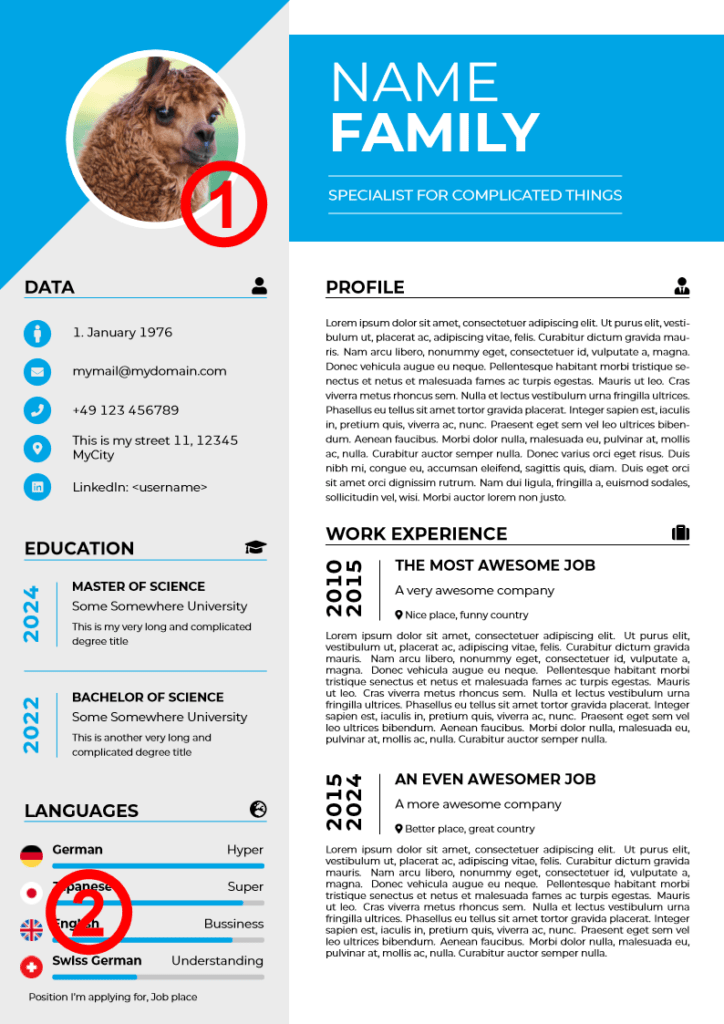
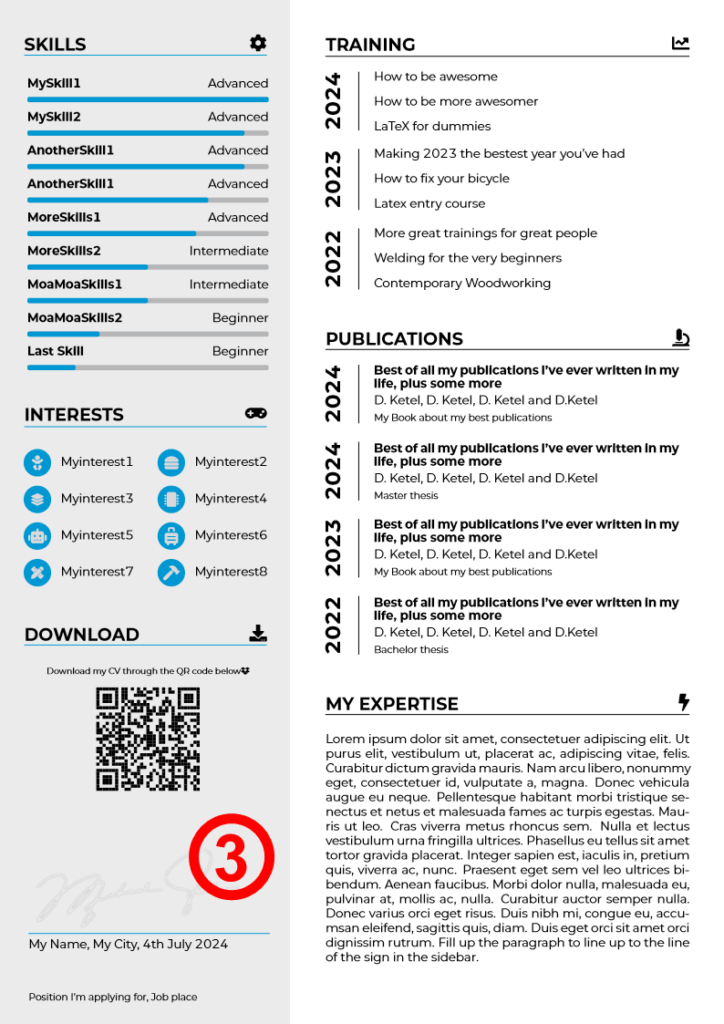
There basically are three images in the CV:
- The avatar (
Images/Avatar.png, but you can choose the filename freely, more on that later) - The country flags (filename is automatic, more on that later)
- The sign (
Images/Sign.png)
The only filename you can’t really influence is the Sign.png, because this really needs to be a PNG (Portable Network Graphics) due to the transparency. The Flag icons technically could also be square (which would look awful…), but due to creative reasons are round and thus also need to be PNGs, so you can’t choose the format here either.
The avatar is cropped to the round shape using TikZ, so it could also be a JPG (JPEG, Joint Photographic Experts Group) file. I will explain this in detail later, when we talk about main.tex.
Another thing that should go into this folder, but you’re free to do this as you please, are the fonts used for your CV. That’s why I sometimes also call it the ‘assets’ folder.
The .sty file, ketelcv2024.sty
Firstly, the style file defines everything related to the looks and the feel of the document, starting with fonts, through colors to different configuration options.
General structure
The file mainly consists of 4 parts:
- Formatting (incl. fonts)
- Colos
- Options
- Functions
Above all, if you don’t have much LaTeX experience, parts 1 through 3 are what you want to edit. Part 4 are the functions that make up the document with the parameters and texts you specify. Let’s look at each of the sections.
Fonts and Formatting
As mentioned before, this section changes the formatting and the fonts of the document. Before diving into each setting, there are a few things to keep in mind when working on this. Changing each of these objects does lead to text shifting around the page altogether. As I will explain in detail later, you are responsible for the page break(s). If your text extends over more than one page, this will likely cause a broken document or compilation errors.
1 Language
- cvLanguages
This setting is used for general formatting, such as dates and numbers. If multiple main .tex files for different languages will be created later on, just add all languages here, separated by commas. By doing so you do not need to create (an keep in sync) multiple versions of the .sty file.
2 Font options
- cvMainFont
Sets the main font that used throughout the document. - cvMainItalicFont
This enables you to use a different font as italic font. If your main font does not include italic, make sure to set this one. Otherwise you won’t have italic letters. - cvMainBoldFont
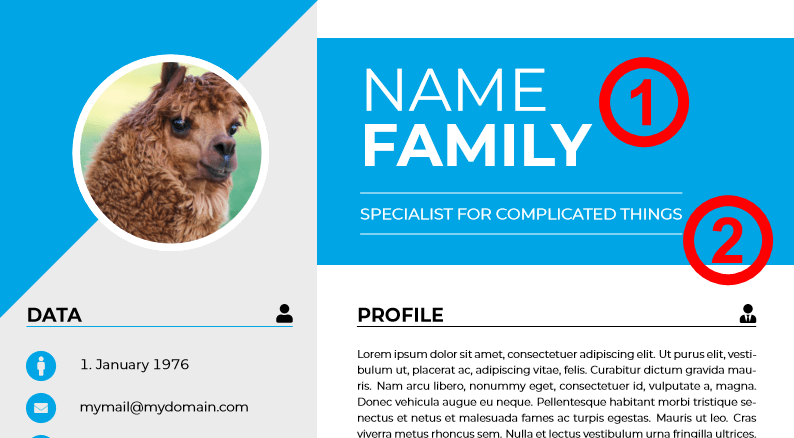
This enables you to use a different font as bold font. If your main font does not include bold, make sure to set this one. Otherwise you won’t have bold letters. - cvHeaderFontscale
Sets the scale factor of the document header (marked with 1 in image below) relative to the normal font size - cvHeaderSubtitleFontScale
Sets the scale factor of your title (marked with 2 in image below) relative to the normal font size
Margins
In short, margins are the distance the text keeps to paper border. Additionally, decorative elements have their geometries and margins set separately.
- cvMarginTop
Changes the top margin of the document - cvMarginRight
Changes the right margin of the document - cvMarginBottom
Changes the bottom margin of the document - cvMarginLeft
Changes the left margin of the document
Sidebar
The sidebar is the left portion of the document that contains your “metadata” for example.
- cvSidebarWidth
The width of the sidebar. - cvSidebarBorderWidth
The width of the border between the sidebar and the main section. If you do not want a border here (like it is the default), adjust the border’s color to be the same as the the sidebar’s background. Alternatively, change the following option. - cvSidebarBorderDraw
Decides if the sidebar’s border is drawn. Set to 1 to draw border, 0 to not draw. - cvSidebarTriangleBorderDraw
Decides if the triangle in the sidebar top has a border drawn or not. Set to 1 to draw border, 0 to not draw.
Avatar
The avatar in this case is your Photo on the first page of the document.
- cvAvatarDiameter
The diameter of the avatar image. The border will be added to the outside of the avatar image. - cvAvatarBorder
Thickness of the border around (outside!) the avatar image. If you don’t want a border
Header
To clarify, the header is the top right banner in the main section that contains the name and title.
- cvHeaderHeight
Sets the total height of the header banner - cvHeaderBorderWidth
Thickness of the border around (outside!) the header banner. If you don’t want a border (like it is the default), adjust the border’s color to be the same as the the sidebar’s background. Alternatively, change the option cvHeaderBorderDraw to 0. - cvHeaderOffset
Top “margin” of the header banner. Altogether, this is the distance between the page’s top border and the banner’s top. - cvHeaderBorderDraw
Decides if the header has border drawn or not. Set to 1 to draw border, 0 to not draw.
Colors
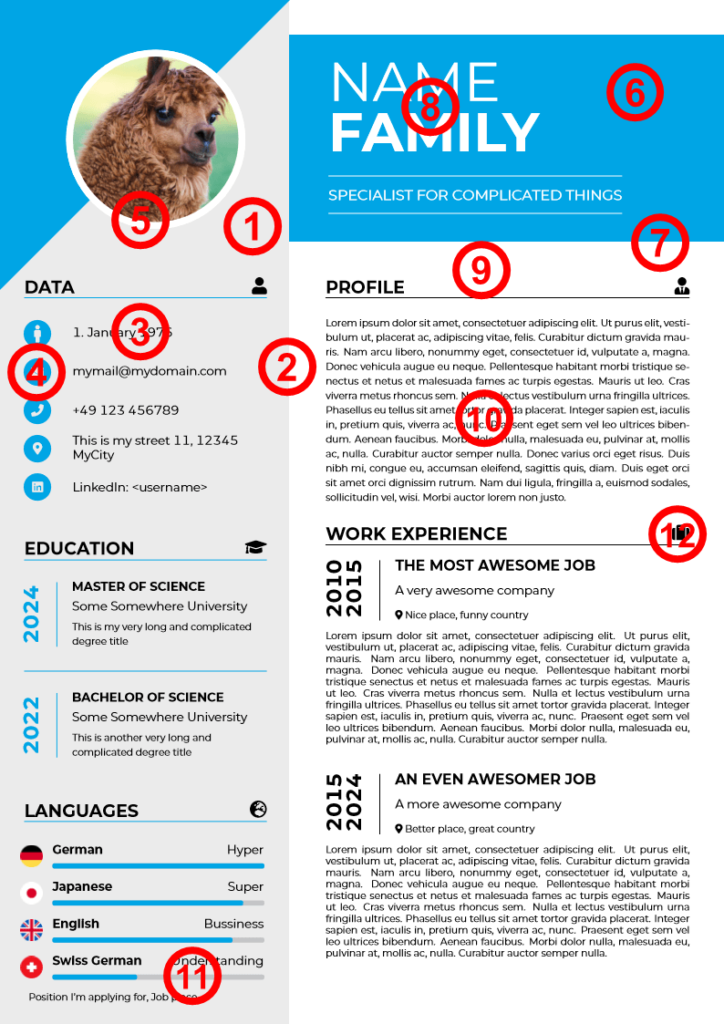
The colors are generally just numbered in the order they appear in the style file. The numbers in the images below the list do indeed show the association of the numbers to the document.
- cvSidebarBackColor
Background color of the sidebar (light gray in image) - cvSidebarBorderColor
Color of the border between the sidebar and the main area (none in image) - cvSidebarTextColor
Color of the text in the sidebar (black in image) - cvSidebarDataIconColor
Text color of the icons inside the circles in front of each data in the “DATA” section in the sidebar (same as sidebar background) - cvAvatarBorderColor
Color of the border around the avatar (white in image) - cvHeaderBackColor
The color of the banner in the top of the main area. This color is automatically also used for the triangle in the top of the sidebar and generally as accent color (light blue in image) - cvHeaderBorderColor
Color of the border above and below the header (none in image) - cvHeaderTextColor
Color of the text inside the header (white in image) - cvMainBackColor
Background color of the main area - cvMainTextColor
Text color of all text in the main area of the document (black in image) - cvSidebarProgressBack
Background color of the progress bars (languages and skills) (dark gray in image) - cvSectionIconColor
Color of the icons in the section titles, sidebar as well as main area (black in image)
Options
There are not many options, but a some small things you can change currently.
- \setlength{parindent}{0mm}
If you want the first line of all your paragraphs indented by a given amount, set the amount in the last pair of brackets. Be warned, that this will also affect the positioning of unexpected elements like bullets of other text. - \pagenumbering{gobble}
In fact, if you want page numbers on your CV, feel free to change the pagenumbering to the style you prefer. - \overfullrule=0mm
Certainly, this one is only interesting for “debugging” your document. To clarify, if you’re having problems with elements shifting around or ending up in unexpected places, often overfull text boxes are the problem. By changing this option you can make LaTeX draw a bar of the specified width at the end of the overfull text box to also give you a visual clue as of what the problem might be. Usually 1 or 2 mm is enough.
The main .tex file, main2024.tex
Since most visual aspects are “outsourced” into the .sty file, the .tex file(s) mostly cover the structure and contents of the document. The document structure shown in the template certainly is only a suggestion and how I did it. You obviously are free to align the sections in a totally different order.
There is only one rule: You must fill the sidebar for all pages before you can fill the main section. Moreover, in both document areas you must specify the page breaks. Otherwise the document will break if you have more than one page worth of content. So make sure the properly place your page beaks.
General structure
As mentioned before, the document is divide into two parts:
- The sidebar
- The main content area
The .sty file has functions defined for both areas, but there are a few higher-level functions.
The only thing you have to keep in mind in fact is the order in which you have to assemble the document. As illustrated in the image below, your first fill up the sidebar. Above all, keep in mind that you need to place a \newpage command manually.
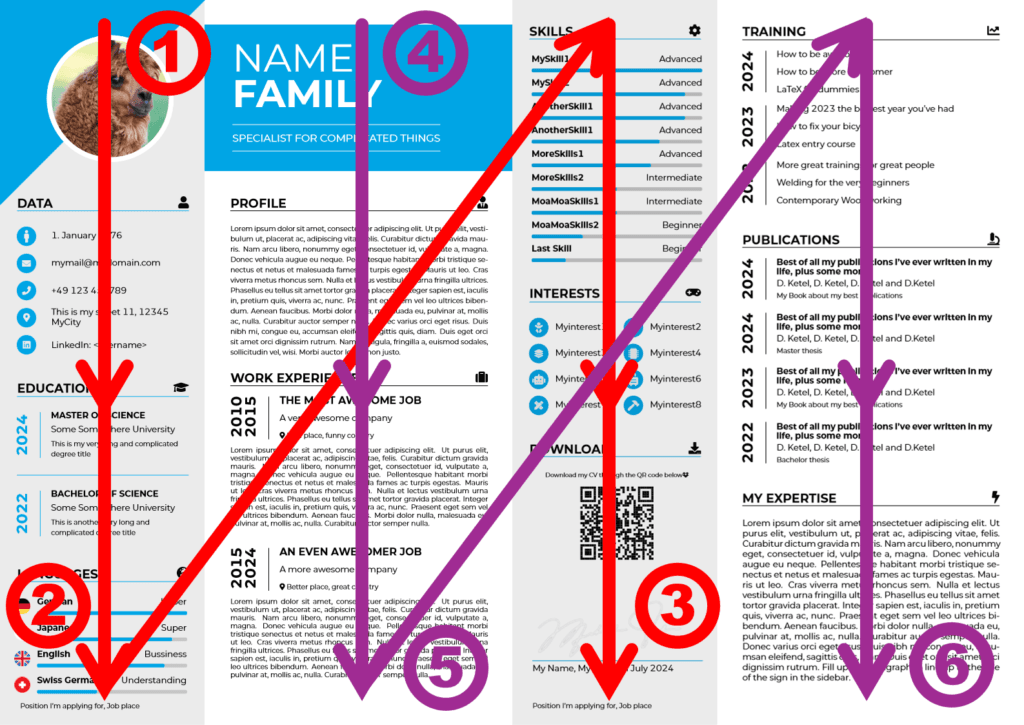
- Start the CV by opening the cv environment and start filling the Sidebar with data.
- Once you reach the end of page 1, start a new page with the
\newpagecommand. - Close the sidebar by using the \cvSidebarEnd command. As a result, all content you add from now will be placed in the main section, starting with page 1 again.
- Fill the main section with data
- Once you reach the end of page 1, start a new page with the
\newpagecommand. Additionally, if you want to go the extra mile in looks, make sure that the bottom of the text in your main section aligns with the bottom of you sidebar’s content. In this case you would align the bottom ot the “Swiss German” bar with the Description text of the job from 2015-2024. - As before, make sure that the bottom of your main section’s content aligns to that in the sidebar for extra clean look. In this case it would be the text below the signature and the “Expertise” section’s text. Make sure to close the cv environment.
The cv environment
Firstly, open the document environment with \begin{document}. Secondly, the cv environment has to be started, which is demonstrated in the code block below:
\begin{cv}{Avatar.png}{Name}{Family}{Specialist for complicated things}[british][Position I'm applying for, Job place]

\end{cv}
The cv environment has four mandatory arguments, besides two optional arguments:
- Avatar image’s filename (“Avatar.png”). The image with the given name in the “Images” folder is used as avatar image correspondingly.
- First name (“Name”). The first name, the one printed in the upper portion of the header.
- Family name (“Family”). The family name, the one printed in the bottom portion of the header.
- Title (“Specialist for complicated things”). Describes what you are. A real world example would for example be “Freelance Programmer” or “Marketing Research Assistant” or whatever you are (or want to be).
- [Optional] Language (“british”). If you have multiple language versions of your cv, insert a language from the list you’ve specified in the .sty file here. For a list of valid languages, check the top of the .sty file.
- [Optional] Position (“Position I’m applying for, Job place”). The name of the position you’re applying for, including the location. Real world examples might be “Project Engineer, Zurich” or “Direct Mail Account Manager, London”, basically just the job title you’re applying for, including the planned location from the ad.
Your whole document, starting with the sidebar, will go between the \begin{cv} and \end{cv}, basically line 2 in the above snippet.
The sidebar knows exactly one environment, namely the cvSidebarSection. Additionally it knows a few commands that do different things.
cvSidebarSection environment

\begin{cvSidebarSection}{DATA}{\faIcon[solid]{user}}

\end{cvSidebarSection}
Overall this environment automatically takes care of the spacing between the sections and draws all elements opening and closing a section in the sidebar. There are two mandatory arguments for the cvSidebarSection:
- Title of the Section (“DATA”).
- Icon of the Section. The fontawesome5 package documentation contains a list of icons and how to use them. Of course, you are free to use whatever printable character as icon the LaTeX compiler can handle. If you don’t want icons (why would you want that?! 😱) just leave it blank.
All content for that section must be within the corresponding \begin{cvSidebarSection} and \end{cvSidebarSection} statement, so line 2 in the example above. Of course, it does not have to be in one line, multiple lines are totally fine. The following subsubsections elaborate on the possible contents for this environment.
cvSidebarDataEntry command

\cvSidebarDataEntry{\Large\faMale}{1. January 1976}- Icon that is printed next to the data
- Actual data to print
cvSidebarEducationEntry command

\cvSidebarEducationEntry{2024}{Master of Science}{Some Somewhere University}{This is my very long and complicated degree title}- The year the degree has been finished (“2024”)
- Name of the degree (“Master of Science”)
- Place the degree has been attained (“Some Somewhere University”)
- Title of the Degree (“This is my very long and complicated degree title”, for example “Computer Science and Communications Engineering”)
cvEducationSeparatorBar command

\cvEducationSeparatorBarBesides creating a simple separator that can be used between multiple cvSidebarEducationEntrys, this function doesn’t serve a specific purpose. Totally optional.
cvSidebarLanguageEntry command

\cvSidebarLanguageEntry{English}{Business}{.85}- Name of the language (“English”). See Note below.
- Level of the language, verbal (“Business”)
- Level of the language, numeric, min. 0, max. 1 (“.85”)
Note: The country flag icon next to the entry is indeed placed automatically. Therefore, make sure that the correct icon is placed in the Images folder and is named <language>.png, replacing <language> with the language’s name. In this case this results in a file named German.png.
cvSidebarSkillEntry command

\cvSidebarSkillEntry{MySkill1}{Advanced}{1}- Name of the skill (“MySkill2”, for example “Data analysis”)
- Level of the skill, verbal (“Advanced”)
- Level of the skill, numeric, min. 0, max. 1 (“.9”)
cvSidebarInterestEntry command

In contrast to all other entry types, one entry of the cvSidebarInterestEntry command always consists of two entries. Due to this the entries will be a lot more compact.
\cvSidebarInterestEntry{\large\faIcon[solid]{baby}}{Myinterest1}
{\large\faIcon[solid]{hamburger}}{Myinterest2}- Icon to print next to first interest (“\large\faIcon[solid]{baby}”)
- The string of the first interest (“Myinterest1”, for example “Family”)
- Icon to print next to second interest (\large\faIcon[solid]{hamburger}”)
- The string of the first interest (“Myinterest2”, for example “Cooking”)
cvSidebarPlaceSign command

This command will place the signature image (Images/Sign.png), including the name and date below the image. As a rule, try to make sure that the background of your sign is transparent.
\cvSidebarPlaceSign{My Name}{My City}{-0.8cm}- Place your name here again (“My Name”)
- Your current location (“My City”)
- Adjustable spacer between signature’s image and text. You’ll likely have to experiment a bit with this one.
The main content area
The main section knows exactly one environment, namely the cvMainSection. Additionally it knows a few commands that do different things.
cvMainSection environment
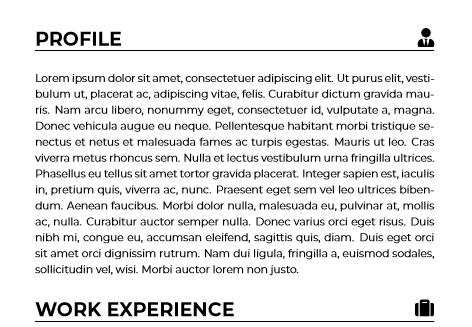
\begin{cvMainSection}{Profile}{\faIcon[solid]{user-tie}}

\end{cvMainSection}
Overall this environment automatically takes care of the spacing between the sections and draws all elements opening and closing a section in the sidebar. There are two mandatory arguments for the cvSidebarSection:
- Title of the Section (“Profile”).
- Icon of the Section. The fontawesome5 package documentation contains a list of icons and how to use them. Of course, you are free to use whatever printable character as icon the LaTeX compiler can handle. If you don’t want icons (why would you want that?! 😱) just leave it blank.
All content for that section must be within the corresponding \begin{cvMainSection} and \end{cvMainSection} statement, so line 2 in the example above. Of course, it does not have to be in one line, multiple lines are totally fine. The following subsubsections elaborate on the possible contents for this environment.
cvMainWorkExperienceEntry command
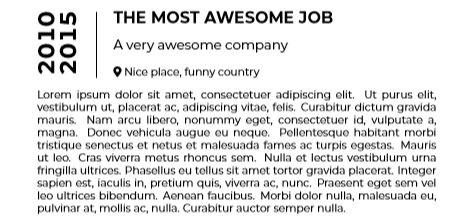
\cvMainWorkExperienceEntry{2010}{2015}{The most awesome Job}{A very awesome company}{\faIcon[solid]{map-marker-alt} Nice place, funny country}{\lipsum[][1-15]}- Start year (“2010”)
- End year (“2015”)
- Title of job position (“The most awesome Job”), for example “Key Account Manager”
- Name of the company (“A very awesome company”)
- Job location (“Nice place, funny country”), I personally love to add the map marker icon to it, see example
- Brief description of the work contents (here “lorem ipsum” generated through
\lipsum)
cvMainTrainingEntry command

\cvMainTrainingEntry{2023}{
  Making 2023 the bestest year you've had\\[.3cm]
  How to fix your bicycle\\[.3cm]
  Latex entry course
}- Year the trainings were done or finished (“2023”)
- List of trainings in which the trainings were done or finished. I’ve separated them with .3cm line breaks to adjust the bottom of the main content with the bottom of the sidebar content in particular. Overall, choose what looks good for you.
cvMainPublicationEntry command

\cvMainPublicationEntry{2024}{Best of all my publications I've ever written in my life, plus some more}{D. Ketel, D. Ketel, D. Ketel and D.Ketel}{My Book about my best publications}- Year of the publication (“2024”)
- Title of the publication (“Best of all my publications I’ve ever written in my life, plus some more”
- Author(s) (“D. Ketel, D. Ketel, D. Ketel and D.Ketel”)
- Type of publication, publisher, conference name, depends a bit on the publication type (“My Book about my best publications”)
Troubleshooting / Known Issues
As of writing this article, I don’t know of any real issues, only one small problem.
- If you don’t place a
\newpagecommand and content spills from one page to the next page the document will definitely break an you’ll get blank pages. So make sure to place\newpagecommands before the content slips onto the next page. - The content spill issue also occurs if you place an image and the margin around the image is bigger than the space remaining on the page.
Conclusion
In conclusion, with the flexible LaTeX cv template I’ve developed and introduced in this article you can easily craft an outstanding and beautiful cv for your job applications. By using this template, adapting the contents and looks of your cv individually for each application is easy and you can focus on the contents rather than needing to painstakingly adapting each cv for each application manually.
Thanks a lot for reading! If you have questions or suggestions, please do not hesitate to comment below or contact me. Should you find any issues, it would be amazing if your could submit them to me through github.
