
Disclosure: At the end of this efficient home server article I use amazon affiliate links. They don’t cost you anything, but help me offset some of the cost for running this page. For details, check the affiliate disclosure.
If you’re like me, you want to be able to access all your digital life from anywhere. But, you also don’t want to put your personal documents and data on third party servers. Yes, the security of Google’s data centers against unauthorized access might be a lot better than that of my home server. Yet, if the guard is the one reading my data it kind of defeats the purpose. So, having an efficient home server to host all my services would be ideal.
There’s tons of services you might like to run yourself. Some of them might be:
- Network attached storage
- Home automation
- Password manager
- Calendar(s)
- Private messenger
- and lots and lots more
People certainly often use old hardware for machines to run these services. I’m not too big of a fan of this, since old hardware usually is slow and consumes a lot of power. Especially here in Germany, where electricity is still comparatively pricey. I’d like to keep the power consumption down, hence the efficient home server. Usually, I indeed do recycle hardware as good as possible. But for my new NAS/HomeServer I wanted to invest in new hardware. Mostly because I did not have any hardware lying around for this project. Let’s build an efficient low power home server together 😊
In this 4 part article series I’d like to show you how I chose the components for the efficient home server and certainly what the resulting system is like. The resulting efficient home server in my case does need far below 10 W during idle and yet is more than fast enough to run multiple VMs and containers.
In Part 1 I explain what hardware I have chosen, why and how I chose it. The Part 2 documents the actual build process and power optimizations. The power optimizations are detailed in this Part 3. The last and 4th part (this part) explains the main pitfalls I experienced when configuring all the services I wanted.
If you haven’t read Part 1, Part 2 and Part 3 of this efficient home server series, go check it out now, since it also includes details on how I selected the components and how I got here.
Contents
- 1 TrueNAS Scale for the efficient home server
- 1.1 Fixing TrueNAS SCALE
- 1.2 Installing docker inside an systemd-nspawn container
- 1.3 Creating the systemd-nspawn container
- 1.4 docker installation (+portainer)
- 1.5 Installing Nextcloud-AIO
- 1.6 Other docker containers
- 1.7 Running Home Assistant in a VM
- 2 Managing file permissions
- 3 Conclusion
- 4 Amazon Links for the efficient home server
TrueNAS Scale for the efficient home server
As I’ve written in other articles before, I am using TrueNAS SCALE on my new NAS System. Previously, I have been using OpenMediaVault (OMV) on my old NAS. It served it’s purpose and always did what I wanted. With my new NAS however I wanted to get my self-hosted services all into one machine. Plus, I wanted to try something new. Both Unraid and TrueNAS SCALE looked very interesting and promising. In the End, after playing around quite extensively with both, I’ve decided to use TrueNAS SCALE for two reasons:
- I liked the way disks management a lot better in TrueNAS SCALE
- I personally hate the idea of having my OS run on an USB stick, which at the same time also is my license.
Especially the second point seems like a nightmare in terms of reliability to me. Likely it’s not that bad, because unraid also has a huge community. But I wasn’t comfortable with it, so I decided against unraid.
Fixing TrueNAS SCALE
Not all was good with TrueNAS SCALE either. There were two points, that especially bothered me:
- TrueNAS SCALE occupies all of the system disk. You can’t use it for anything else, no matter how big the disk is.
- By default, containers are handled by kubernetes (k3s)
So I set out to “fixing” TrueNAS SCALE to better suit my needs. With a bit of research I’ve found that it’s pretty easy to get the blocked drive space back from TrueNAS SCALE. I’ve written a detailed post about unblocking the system drive, go check it out. In the course I’ve also developed a script to automate the process, so you don’t have to do all that typing work 😁
The second point needs some clarification, I guess. I’m not against using kubernetes. But, as mentioned before, the whole efficient home server series is about building a NAS/home server with a very low power consumption. Problem with k3s in this case is that even without running any containers it already let’s the power consumption of my little machine go up around 5W. Considering that it’s idling at around 12 W, that’s an increase of more than 40%. So, a different solution for running containers must be found.
Installing docker inside an systemd-nspawn container
First off, if you’re not interested in the details or don’t want to do it manually, I still have got something for you, a script I’ve developed that will install docker for you. You can download it and get instructions in the github repo. In this article I’ll only show the steps to get an systemd-nspawn container equipped with docker. For detailed explanations I’m working on an in-depth article on this topic.
In the end I installed docker inside a systemd-nspawn container. This had nearly zero overhead and did not increase the power usage of my efficient home server. The installation of docker inside the systemd-nspawn container is pretty straigh forward, but let’s not rush things, we first have to create the systemd-nspawn container.
Creating the systemd-nspawn container
To create the systemd-nspawn container, a few preparations are necessary:
- Create the filesystem
- Prepare the network
- Start the container
- Automatically starting the systemd-nspawn container at boot
I’ll shortly go through each step how I’ve solved it for this situation. For a more comprehensive view on the topic, go check out my in-depth article, which I’ll link here once it’s done.
1. Create the filesystem
It’s a very simplified view on the things, but systemd-nspawn basically is just a very fancy chroot. So the filesystem for the container is just a folder on your host’s disk. So we need to create a container, fill it with the necessary system files and tell systemd-nspawn about it.
Choosing the folder’s location
Please make sure that the folder you choose is not on the system partition, but rather in some dataset. If you want to know why, again, please read the in-depth article (coming in the next days). Ideally you’ll put it in a dataset that is not equal to your main RAID. Due to the design of my modified TrueNAS SCALE, I’ve chosen /mnt/services/docker-nspawn as folder for my root filesystem. To do that, open up a shell and execute
sudo mkdir /mnt/services/docker-nspawn
cd /mnt/services/docker-nspawn
Filling the filesystem with a system
I’ve chosen debian as the system to run inside my systemd-nspawn container. I did this because for one I am very familiar with debian. The other reason ist that TrueNAS SCALE is also based on debian, so things like default user and group ids are the same, which will be very interesting when we talk about file permissions.
The easiest way would be to just use deb-bootstrap. Getting it to work in TrueNAS SCALE was not as straight forward, so I abandoned this idea early on. Therefore, I would simply go download the base system tarball from the nspawn download area (thank you to the nspawn-team for letting me use this download link!).
After downloading, just extract the root filesystem into a folder, I’ve named it rootfs:
sudo wget https://hub.nspawn.org/storage/debian/bookworm/tar/image.tar.xz
sudo tar -xf image.tar.xz -C rootfs
To be able to run the image with systemd-nspawn, we need to prepare a few more things:
sudo rm rootfs/etc/machine-id
sudo rm rootfs/etc/resolv.conf
sudo touch rootfs/etc/securetty
for i in $(seq 0 10); do
  sudo echo "pts/"$i >> rootfs/etc/securetty
done
Without deleting the files the container won’t initialize. Also, if the securettys are not created you won’t be able to enter the container later. But we definitely want that. Creating 10 should be more than enough.
2. Prepare the network
If you don’t have a network bridge yet, now is the time to create one. There are also other methods to connect a systemd-nspawn container to an existing network, but using a network bridge is by far the easiest. Plus, we’re going to need it for the HAOS VM later anyway.
You can either do it through the WebUI or through the command line interface (CLI). I’ll show you both ways very briefly, choose which you like better (personally, I think the CLI way is a lot easier, since you just need to copy & paste).
One noteworthy thing at this point is that all this of course also works with WiFi ports. If you want to use WiFi, do it, personally I think depending on the setting that’s totally ok. But, understand that that’s not supported by TrueNAS SCALE and will, too, be a bit of work.
Adding the bridge through the WebUI
Make sure you’ve got a screen hooked up to your TrueNAS SCALE machine, since we need it to find out the new IP address, should you want the network bridge to be configured through DHCP.
- In the WebUI, open the network panel. This should show you all available network adapters, including bridges.
- Click on “Add”.
- In the popping up “Add Interface” panel, choose “Bridge” as type. Choose a name, I’ll go with “br0”, optionally add an description. Do not Check DHCP at this point and do not select a bridge member yet. Click on “Save” to save and return to the overview.
- Apply the settings and confirm them.
- Open the settings of the original network adapter, here enp0s3, by pressing the pen symbol in that row.
- In the now open “Edit Interface” panel, remove the DHCP checkbox. Click on “Save” and return to the overview.
- Do not apply the settings yet!
Open the settings of the network bridge created in step 3, again by pressing the pen symbol next to it. - After the “Edit Interface” panel has appeared again, check the DHCP checkbox and add “enp0s3” as Bridge Member. Click “Save” to return to the overview.
- Click apply the new settings.
- To confirm the settings, you’ve got to be quick. Take a look at the screen hooked up to the TrueNAS SCALE machine. At some point it will show you a message like
The web user interface is at:
http://192.168.178.xxx
https://192.168.178.xxx
Quickly head to that IP in the browser and log in. Open the “Network” panel and confirm the settings.
Now you should have a fully functioning network bridge.
You may also do everything in one go without applying the settings in step 4 if you have TrueNAS SCALE 24.04. With pre-24.04 versions of TrueNAS SCALE I sometimes had problems creating the network bridge and applying the settings in step 4 helped me in those cases.
Adding the bridge through the CLI
The commands we’ll be using assume the following:
- Ethernet port name: enp4s0
- Bridge name: br0
cli -c "network interface update enp4s0 ipv4_dhcp=false"
cli -c "network interface create name=\"br0\" type=BRIDGE bridge_members=\"enp4s0\" ipv4_dhcp=true"
cli -c "network interface commit"
cli -c "network interface checkin"
That’s it, we’re done 😊
What it does is similar to what you’d manually do in the WebUI:
- Disable DHCP for the ethernet port
- Create the bridge and add the ethernet port as a member, plus enable dhcp for the bridge
- Commit the changes (will start a 60s timer, after which the settings will be reverted)
- Confirm the changes and make them permanent.
Note that the IP of your bridge might be different. If you have a screen connected to your NAS, the new IP will be displayed there. Otherwise use the interface of your DHCP server to find out the new IP. If you want the bridge interface to have the IP of the ethernet adapter, either configure your DHCP server accordingly or manually set the IP of the bridge:
cli -c "network interface update enp4s0 ipv4_dhcp=false"
cli -c "network interface create name=\"br0\" type=BRIDGE bridge_members=\"enp4s0\" ipv4_dhcp=false aliases=[\"<IP of the ethernet adapter>/24\"]"
cli -c "network interface commit"
cli -c "network interface checkin"
Make sure to replace <IP of the ethernet adatper> in the second row with your IP and enp4s0 in the first two rows with your actual network adapter.
3. Starting the container
With the network bridge in place now, we can finally start the systemd-nspawn container.
This basically is just a single command, bu you need to adjust a few things for your case:
--unitsets the unit’s name to, in my case “dockerNspawn”. Check this article if you want to know details about systemd units.--working-directoryhas to be set to the directory where your rootfs folder is in. Make sure to not give the rootfs folder here, but rather it’s parent folder! In my case I’ve used/mnt/services/docker.--descriptionis optional, but it will certainly help if you have multiple systemd-nspawn containers running on the same machine--machineselects the container’s name. I’ve chosen the same as the unit’s name here.--network-bridgemust match the name of the network bridge you’ve created earlier
systemd-run --property=KillMode=mixed --property=Type=notify --property=RestartForceExitStatus=133 --property=SuccessExitStatus=133 --property=Delegate=yes --property=TasksMax=infinity --collect --setenv=SYSTEMD_NSPAWN_LOCK=0 --unit=dockerNspawn --working-directory=/mnt/services/docker '--description=systemd-nspawn container creates by TNSH to run docker' --setenv=SYSTEMD_SECCOMP=0 --property=DevicePolicy=auto -- systemd-nspawn --keep-unit --quiet --boot --machine=dockerNspawn --directory=rootfs --capability=all '--system-call-filter=add_key keyctl bpf' --network-bridge=br0 --resolv-conf=bind-hostIt would have taken me considerably longer to figure this out without Jip-Hop’s jailmaker, so I would like to send a big thanks to him at this point. Go check out his script.
Additionally, if you want to bind some folder of your host machine to the container, you can add --bind='hostFolder:containerFolder' to the command. You can also add multiple bind arguments to the systemd-run command.
4. Automatically starting the systemd-nspawn container at boot
The container has to be started manually during each boot. Since TrueNAS SCALE uses its own init system, you need to start the container from there. Which, luckily, is easily possible through the WebUI. In the WebUI, navigate to Settings > Tasks > Init/Shutdown Scripts. To add a new init command, click on Add. In the now open dialog, select Command as Type. In the command field, copy the command you used to start the container from above. For “when” just select After start.
Alternatively, if you’re using my TrueNAS SCALE helper script, it will automatically handle all this for you.
docker installation (+portainer)
Now that we’ve got our systemd-nspawn container running, we need to get docker (docker engine, to be correct) running inside. Once you open a shell inside the systemd-nspawn container, installing docker is no different that installing it on any other machine. You just need to get inside the machine and then install docker as usual. To enter the container, use the machinectl command:
machinectl shell dockerNspawnMake sure to replace the dockerNspawn argument with the container’s name you specified with the --machine argument during creation/start.
To install docker, from this point on you can just follow the instructions on the docker docs page. If you’ve followed the guide, the debian you now have inside the systemd-nspawn container is an ordinary debian bookworm. The easiest method is to install the docker engine inside the systemd-nspawn container using apt. Here are the commands you need, copy and pasted from the docker docs:
# Add Docker's official GPG key:
sudo apt-get update
sudo apt-get install ca-certificates curl
sudo install -m 0755 -d /etc/apt/keyrings
sudo curl -fsSL https://download.docker.com/linux/debian/gpg -o /etc/apt/keyrings/docker.asc
sudo chmod a+r /etc/apt/keyrings/docker.asc

# Add the repository to Apt sources:
echo \
  "deb [arch=$(dpkg --print-architecture) signed-by=/etc/apt/keyrings/docker.asc] https://download.docker.com/linux/debian \
  $(. /etc/os-release && echo "$VERSION_CODENAME") stable" | \
  sudo tee /etc/apt/sources.list.d/docker.list > /dev/null
sudo apt-get update
To manage the containers I personally like to use portainer. Again, at this point the systemd-nspawn container can be handled as an ordinary debian bookworm system. Installing the Portainer CE is as easy as just creating a permanent storage for the configuration and starting the Portainer container using docker:
docker volume create portainer_data
docker run -d -p 8000:8000 -p 9443:9443 --name portainer --restart=always -v /var/run/docker.sock:/var/run/docker.sock -v portainer_data:/data portainer/portainer-ce:latest
Installing Nextcloud-AIO
To install Nextcloud AIO, you must make sure that your systemd-nspawn container ist reachable from the outside world. To keep this article to a reasonable length, this topic will not be covered at this point. Be it directly or through a reverse proxy is up to you, just make sure it’s reachable from the web. Otherwise the let’s encrypt client won’t be able to get an SSL certificate for your server and the install will abort.
If you’re using a reverse proxy, mind that there’s is a different documentation to follow than without a reverse proxy. In a nutshell, you just start the Nextcloud AIO container and continue the setup in your browser.
Without a reverse proxy:
# For Linux and without a web server or reverse proxy (like Apache, Nginx, Cloudflare Tunnel and else) already in place:
sudo docker run \
--init \
--sig-proxy=false \
--name nextcloud-aio-mastercontainer \
--restart always \
--publish 80:80 \
--publish 8080:8080 \
--publish 8443:8443 \
--volume nextcloud_aio_mastercontainer:/mnt/docker-aio-config \
--volume /var/run/docker.sock:/var/run/docker.sock:ro \
nextcloud/all-in-one:latest
With a reverse proxy, after setting up your reverse proxy:
# For Linux:
sudo docker run \
--init \
--sig-proxy=false \
--name nextcloud-aio-mastercontainer \
--restart always \
--publish 8080:8080 \
--env APACHE_PORT=11000 \
--env APACHE_IP_BINDING=0.0.0.0 \
--volume nextcloud_aio_mastercontainer:/mnt/docker-aio-config \
--volume /var/run/docker.sock:/var/run/docker.sock:ro \
nextcloud/all-in-one:latest
After starting the container, go to the webinterface at https://<IP of your nextcloud AIO container>:8080 and follow the instructions there.
Other docker containers
Now is a good time to install all other containers you’d like to run on your machine, like Watchtower (automatically keep all containers up-to-date), Vaultwarden (self-hosted password manager) and many other fantastic containers.
Running Home Assistant in a VM
Depending on the install method, Home Assistant will have different abilities and functions. In my eyes the installation of Home Assistant in a virtual machine (VM) is by far the easiest and most versatile. Therefore, my Home Assistant is running as a VM on my NAS. Installing HAOS in a VM in TrueNAS SCALE is a bit finnicky to be honest. You can, of course, do it manually, but in this case I’d really recomment using my TrueNAS SCALE helper script. You can do it all manually, but you’d have to do most things in the shell anyway. So, you might let the script do all the work, too.
Creating the VM
You can create the VM using the WebUI, too, but since we’ll be doing most things in the shell anyways, I’ll show you how to do it from the shell:
cli -c "service vm create name=\"HAOS\" memory=2048"
cli -c "service vm query" | grep HAOS
The first command will create a VM with the name “HAOS” with 2 GB of memory assigned to it. The seconds command will get a list of all VMs that contain “HAOS” in their name or description. Make sure you make note of the VM’s ID, we’ll need it later.
Next, we need to download the current disk image for HAOS. To get the latest stable version, create a folde to store the disk image (will be deleted after the install) and cd into it. Then download the image and unpack it:
sudo mkdir -p /mnt/services/HAOS
cd /mnt/servcies/HAOS
version=$(curl -s https://raw.githubusercontent.com/home-assistant/version/master/stable.json | grep "ova" | cut -d '"' -f 4)
URL="https://github.com/home-assistant/operating-system/releases/download/"$version"/haos_ova-"$version".qcow2.xz"
sudo wget $URL
unxz haos_ova-$version.qcow2.xz
Preparing the system disk
Next, you have to create a zvol that will be used as system disk in the HAOS VM. This can be acheived with the zfs command:
zfs create -s -V 32GB services/haosIf you with to adjust the size of the disk, change it here, but generally speaking 32 GB should be enough for most installs. You could also leave the -s out to habe a non-sparse disk, but disk creation will take a lot longer then. And there’s no benefits in this case. Make sure to set a dataset where the disk will be stored to, in this case I’ve chosen services and haos as the disk’s name.
After creating the disk, we can write the disk image to the disk using the qemu-img convert command:
qemu-img convert -f qcow2 -O raw haos_ova-$version.qcow2 /dev/zvol/services/haosMake sure that you haven’t closed the terminal since you’ve downloaded the disk image. If you have, just rerun the lines where the version and the URL variables are defined. Make sure to replace services and haos with whatever you chose to use before. This command will take a few minutes to complete.
Adding the system disk to the VM
Adding the disk to the VM can again easily be done using the cli command:
cli -c "service vm device create dtype=DISK vm=<VM ID> attributes={\"type\":\"VIRTIO\",\"path\":\"/dev/zvol/services/haos\"}"Again, make sure to replace services and haos with whatever you have used. As <VM ID> use the ID of the VM you’ve noted right after creating the VM. Now we only have to connect the container to our network, again using th cli command:
cli -c "service vm device create dtype=NIC vm=<VM ID> attributes={\"type\":\"E1000\",\"nic_attach\":\"br0\"}"All this should now give you a fully functioning VM with HAOS inside. If you go to the Virtualization page of your TrueNAS SCALE WebUI it should look something like this:
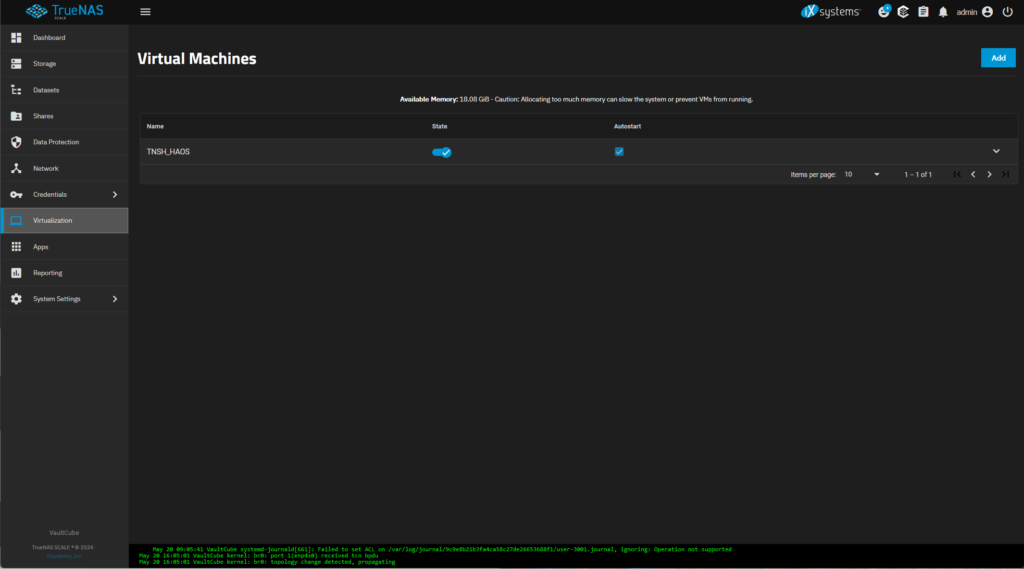
By clicking on the State button of the machine you can turn it on and off. If you check the Autostart checkbox the VM will start automatically after each boot. Make sure to check it for your HAOS VM.
Managing file permissions
I want to be able to access my files from everywhere. That includes PCs at home, public PCs and our android phones. To be able to serve all these machines, I’ve opted to use Samba and Nextcloud-AIO. When accessing files through different channels, file permissions will certainly get in your way sooner or later. In my case I have a minimum of two ways to access my files. Additionally, everybody has a private space and we’ve got a shared space (only one for all at the moment).
My TrueNAS SCALE is sharing the files to the Windows PCs on the network through Samba. File permissions for Samba can be setup separately. Since Nextcloud-AIO in this setup always runs inside a container inside a container (2 additional layers) this also adds to the complexity of the file permissions.
To complicate things further, for Nextcloud to be able to read and write the data, the files must be accessible to the user or group www-data. In Linux (and most other UNIX systems) the user and group names are just for us litty witty humans. The system itself doesn’t care about the names, but only the user IDs and group IDs.
File permissions with different paths
So, I’ve got multiple ways to access files for reading and writing, with at least one path going through multiple container layers. The files are read and written as different users/groups, so if not taken care of properly you’ll have files that are only accessible through one or the other path or not at all.
To make sure all files are – and stay – fully accessible throughout all paths and actions, make sure to follow these two simple rules:
- Keep your UIDs and GIDs organized!
- Use Access Control Lists (ACL) in addition to normal permissions
The first one is particularily interesting for the home directories of the users and the second one for shared spaces that will be accessed by many users. Let’s look at both rules and see what they do in a second, but I’ll shortly explain my data structure before that.
Different rules for different areas
In my TrueNAS SCALE I’ve got one Pool on my RAID called Data that accomodates all my Datasets. I basically have three of them, with only two being interesting here:
- Homes: Contains all user home directories
- Nextcloud: Data root for the Nextcloud-AIO
- Shared: Common storage area for all users to exchange files or keep files that everybody needs to access.
I’ll explain my detailed organization in a future article, but for this article it’s important to know that these storage areas are how I structure our data. The second dataset, Nextcloud, is not of much interest here, but I’ll leave it in anyways. The requirement is that both datasets need to be fully and seamlessly accessible through all paths. So, if I put a file in a dataset through Samba it must be accessible through Nextcloud without any restrictions and vice versa. That’s why all files must also be fully accessible to the group www-data.
One noteworthy thing at this point is that Samba does have own options for permissions and does not play very well with defaults set by the filesystem (through sticky group bits for example). So if you use Samba, make sure to change the settings in the Samba config, too.
1. Keep your UIDs and GIDs organized!
It is of utmost importance to keep your users’ UIDs and GIDs organized and synchronized throughout all the layers through which the files will be accessed. I’ll only discuss the host (the actual TrueNAS SCALE install) and the Nextcloud-AIO (inside docker inside systemd-nspawn), but this concept applies to all other containerized applications, too.
Let’s look at an example file in my home directory:
daniel@VaultCube:~$ ls -la TestFile.txt
-rw-rw----+ 1 daniel www-data 0 May 28 04:10 TestFile.txt
daniel@VaultCube:~$
The permissions of the file are rw-rw----, so the owner user daniel has all rights, the owner group www-data has all rights and others don’t have any rights. Since it’s a text file x is not needed. As I mentioned before, Linux does not care much about the user and group names, but the ids. If we look at the same file with ls -lan again, we can see that the owner user is 3001 and the owner group is 33. In this case these are the two numbers we need to keep track of. You need to do this for all users that are part of your eco-system.
Permissions in Nextcloud
Nextcloud has an own user management and does not rely on linux users and groups, but (unless you chang it) it runs as www-data:www-data. So all files that the Nextcloud should be able to handle (serve and modify for that matter) must at least be accessible to the group www-data. We already found out that on the host system (TrueNAS SCALE) the gid of www-data is 33. I’m handing all necessary directories to use through all the container layers using bind command, so nextcloud has direct access to the folders on the filesystem.
The containers for Nextcloud-AIO use Alpine Linux as base system. Luckily, in Alpine Linux the default gid for www-data is also 33. So I only have to make sure that all data that is created by Nextcloud in the user’s home directories are ideally owned by the user and the www-data group. Since Nextcloud does obey to filesystem defaults set by umasks and/or sgid, you just have to set the proper umasks/sgid for the user’s home directories and everything should go smooth.
How to set the umask
In Linux a umask defines the default file and folder permissions that are applied when a new file or folder is created. The umask is subtracted from the initial file permissions, which are 666 for files and 777 for folders. Let’s look at an example, for 007 as umask:
- Files: 666 – 007 = 660 = rw-rw—- (owner user + group r/w, others no permission)
- Folders: 777 – 007 = 770 = rwxrwx— (owner user + group r/w/exec, others no permission)
For my use case 007 would be good then.
To set the umas to 007 for a folder, execute the following command in a terminal inside the folder you want to apply the umask to:
umask 007How to set the default gid
Setting the sgid on the other hand, if applied to a folder, determines the default owner group of a file in a directory. The default owner user for a file is always the uis the process creating the file is running as and cannot be changed. So for the files created by Nextcloud the owner user always is www-data.
To set the sgid of a folder, in a terminal simply type
chmod g+s /folder/to/apply/sgid/toMake sure the folder’s owner group is set right, too. That should look something like this:
daniel@VaultCube:/mnt/Data/Homes$ ls -la
total 34
drwxrwxr-x+  4 root       www-data  4 Feb  5 19:41 .
drwxr-xr-x   5 root       root      5 Feb 12 15:49 ..
drwxrws---+ 12 daniel     www-data 24 May 28 04:10 daniel
The s instead of the x in the group permissions indicates the set sticky bit.
2. User Access Control Lists (ACL) in addition to normal permissions
For the Shared folder using the “normal” permissions is not sufficient. You could likely wrangle it to work somehow, but using Access Control Lists (ALCs) is a lot more elegant and leaves you flexibility for the future. For example, what if one of our kids gets to the age to have a computer and wants to have access to parts of the Shared files? You could create an additional share and wrangle that one to work again. Or you could just grant the kids access to the files they need to have access to using ACL, which can be done easily.
For the Shared files, the “normal” permissions should be the same as for the home directory files. So in this case rwxrwx---, with www-data as owner group. If now my wife puts a file in the shared folder, the file will belong to her as user, let’s call the user wife, and www-data as group. If I want to access the file, I just can’t. Unless I put myself into the www-data group, too. But then again, I need to add her to that group, too, so she can read the files I put there. And, I think we really should not be part of the www-data group.
That’s where ACLs come in handy. ACLs are basically just extended lists of user permissions. Additionally to the standard POSIX user permissions, you can specify who can do what with a file. ACLs also know three types of access: Read, Write and Execute. For an arbitrary user or group you can define these three access rights, similar to the classic POSIX user permissions.
Reading the ACLs
To look at the ACLs of a file, the getfacl command is used:
getfacl -a TestFile.txtYou can either use the -a option or the long variant --access. There are a lot of other options, check the getfacl man page for details. The output should look something like this:
daniel@VaultCube:~$ getfacl -a TestFile.txt
# file: TestFile.txt
# owner: daniel
# group: www-data
user::rwx
group::rwx                      #effective:rw-
group:www-data:rwx              #effective:rw-
mask::rw-
other::---
Setting the ACLs
In the case of my wife and me, I can just create a new group, let’s call it WifeAndMe. Both my wife and me are members of this group. If all files now additionally get full (read, write and execute) access for this group through ACL, the file’s owner user has full access, Nextcloud can handle the files and the other partner also has full access to the files. Manually adding full access rights to a file testFile.txt through ACL can be done by the following command:
setfacl -m g:WifeAndMe:rwx TestFile.txtThe -m (--modify) is to modify the file’s ACL. g: tells setfacl to set the ACLs for a group and WifeAndMe is the actual group. After another colon the access rights to set (here rwx) are given. To remove then group entry, just use the -x option:
setfacl -x g:WifeAndMe testFile.txtSince setting those ACLs manually for each new file kind of defeats the purpose, we can have a folder (or dataset, which is just a fancy description of a folder basically) where ACLs are set by default. To set such default ACLs, the setfacl command is used again, but with the -d (--default) option. In our example this might look something like this:
setfacl -d -m g:WifeAndMe:rwx /folder/to/apply/default/group/toWith all this set, you should be able to have private and shared spaced on your NAS, which can be accessed though different channels without any restrictions. I’ve been using this setup with Samba and Nextcloud for a while now and am very happy with it. The only thing to keep in mind is that Samba does have its own permission rules when creating new files, so you have to keep track of those, too.
Conclusion
That’s it for the efficient home server 2024 series. Thank you for sticking around and reading what I’ve cobbled together 😊 We’ve come a long way, starting to select the hardware from scratch, assembling everything, setting up power management and finally tweaking TrueNAS SCALE a bit.
I originally planned on having a Server with hardware that idles at unter 10 W, excluding the harddrives. With all services running and gigabit ethernet, 1 ssd and 4 hdds (spun down) the NAS is currently idling around 15 W. With all drives active it’s around 35 W, if the CPU starts to kick in getting above 80 W is no problem either. The system is super silent and very power efficient, yet it has absolutely no problems taking on more complex computing problems like handling multimedia files.
Should you have ideas for improvements or questions, just leave a comment below! If you just want to say hi, drop me a line through the contact form. 👋
Amazon Links for the efficient home server
If you enjoyed the article and would like to say thank you (or build the same system), please consider using one of the Amazon affiliate links from the table below. At this point I still have to manually handle the Amazon Affiliate links, so please choose the location closest to you from the table. As amazon associate I am getting a small share if you buy the products clicking on the links. Thank you 😊
Disclosure: The links below are all Amazon Affiliate links. For details, please check my affiliate disclosure.
Note: I wasn’t able to find a UK smart plug with Tasmota on Amazon UK. Consider using an EU-Plug with an UK-adapter.